What is White Balance?
The human eye and brain will always try to perceive the same colour even when the light source changes. For example, picture a sheet of white paper. In the glaring red sunlight of the morning or under the golden-yellow lights of the evening, the sheet of paper will appear to be differently coloured due to the various colour casts. However, we will always perceive it as the same colour – white. Similarly, your camera tends to recognise the colour white under any light source, and this is known as white balance (WB).
White balance moves inversely according to the light source's colour and corrects it as photos tinted with overly yellow or blue tones can appear ‘unnatural’ to the eye. In other words, under a blue light source, white balance removes excess blue tones by adding more yellow and conversely, under a yellow light source, is adjusted by adding more blue tones. This allows your camera to reproduce colours with greater accuracy.
How to set your white balance
There are three main ways to set your white balance. The first one is Auto White Balance (AWB), which means that your camera will automatically determine the colour temperature of the light source and apply the colour filter appropriately. This will reproduce the colour that a person sees and is generally the most commonly used method.
The second would be preset white balance. The user sets it according to the corresponding environment using various preset white balances, which have been set in advance.
Finally, we have manual white balance. This is directly set by you, the photographer, by adjusting the colour temperature and colour values to your liking. The more experienced you are, the more individualistically you can express yourself rather than simply adjusting your white balance automatically or with presets.
Auto White Balance
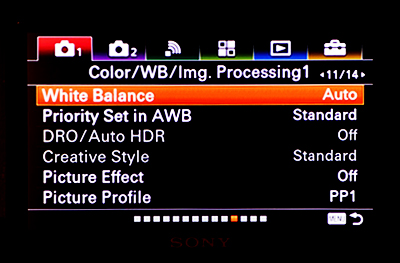
Sony cameras offer users numerous white balance options. You can even set several Auto White Balance options. The most important ones are as follows:
AWB Auto
Automatically detects your light source and adjusts colour tones accordingly. Use this to bring out the atmosphere in your photos.

Priority Set in AWB (still image/movie)
Priority set in AWB selects which tone to prioritise when shooting under lighting conditions such as incandescent light when [White Balance] is set to [Auto]. This can be done by going to MENU → (Exposure/Color) → [White Balance] → [Priority Set in AWB] → desired setting.
Under Priority Set in AWB, you are able to select three options: Ambience, White and Standard.
AWB Ambience:
Not all light has to appear white all the time. For example, imagine a cafe with warm, orange-tinted lighting. The subtle orange light shines on pastries and coffee, making the picture appear warmer and more homely. If you use the ambient light white balance, you can capture the cafe’s comforting atmosphere in the picture more accurately.
AWB White:
You may always want your white balance to be white when the light around you is constantly changing. When white priority is used, your photos will always be expressed in a constant colour regardless of blue light or orange light when the colour temperature of the light source is low.
AWB Standard:
If you want to leave everything to your camera, use STD mode. Your camera will automatically adjust your colour tones for you.
WB presets

You’ll notice many little icons on your camera screen when you go to MENU → [Exposure/Color] → [White Balance] → [White Balance] → desired setting. Those icons are white balance presets. While there may be an intimidating amount of presets, there’s no need to fly into a frenzy just yet. Here is a quick guide to a few key presets you’ll need to remember:
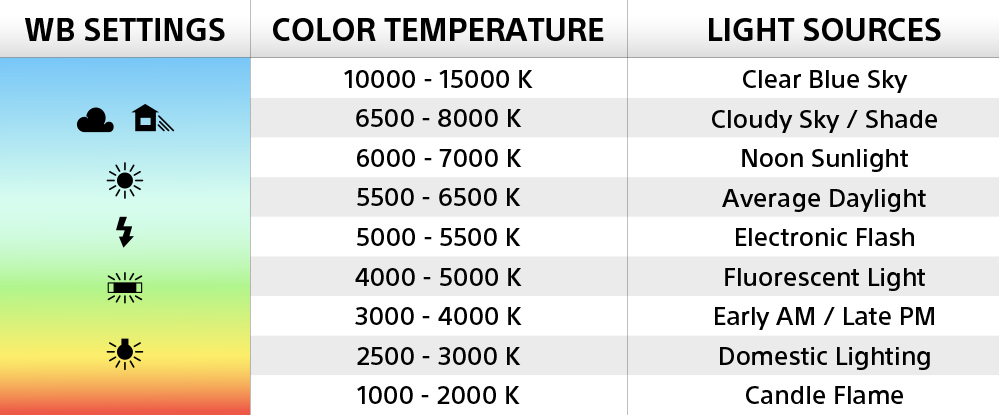
Daylight (5600K)
Considered the most neutral white balance preset. Perfect for shooting under a sunny sky.
Shade (7000K)
When light is hidden by the sun, this preset warms up colour tones.
Cloudy (6000K)
Warms up colour tones as light has a cooler tone under a cloudy sky.
Incandescent (3200K)
Warms up colour tones for indoor shooting under an incandescent lamp, or under bright lighting.
-1Fluor.: Warm White 0Fluor.: Cool White +1Fluor.: Day White +2Fluor.: Daylight (4000K)
Fluorescent light is brighter and thus cooler than incandescent light. Due to the variety of fluorescent bulbs with different colour outputs, these presets allow you to add warmth to your photo according to your lighting conditions.
WB Flash (5500K)
Warms up images to make up for the cooler tones emitted by your flash.
How to set a custom white balance
In situations where presets are just not enough to remove warm and cool tones to your liking, you can always customise and register your own white balance settings, which will definitely come in handy for future use. Here’s a quick guide on how to do it.
1. Go to MENU → [Exposure/Color] → [White Balance] → [White Balance] → Select from among [Custom 1] to [Custom 3] and then press the right side of the control wheel.
2. Select SET(custom white balance set), and then press the centre of the control wheel.
3. Hold your Alpha so that the white area fully covers the white-balance capture frame, and then press the centre of the control wheel.
After the shutter sound beeps, the calibrated values (Color Temperature and Color Filter) are displayed.
- Adjust the position of the white-balance capture frame by pressing the top/bottom/left/right side of the control wheel.
- After capturing a standard white colour, you can display the fine adjustment screen by pressing the right side of the control wheel. Afterwhich, you’ll simply have to adjust the colour tones as needed.
4. Press the centre of the control wheel.
The calibrated values will be registered. The monitor returns to the MENU display while retaining the memorised custom white balance setting, which will remain memorised until overwritten by another setting.
Manual White Balance
MENU → [Exposure/Color] → [White Balance] → [White Balance] → C.Temp./Filter
C.Temp./Filter
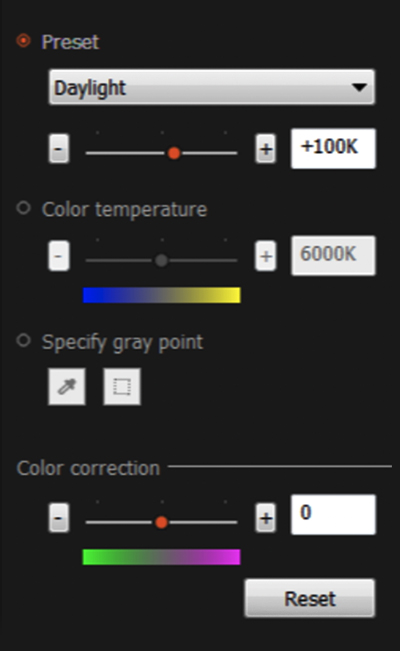
With Manual White Balance, colours can be adjusted entirely based on your preference. You can capture realistic colours that match what you see with your eyes and conversely, you can capture a fantastical world with more individualistic self-expression. If you use manual white balance, detailed colour expression is made possible.
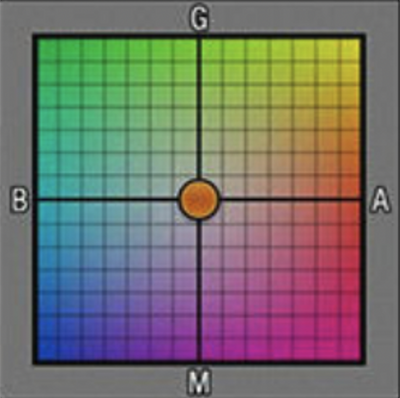
In particular, let's check out this powerful white balance setting tool available in Sony Cameras. Green/magenta hues lie on the Y-axis, while blue/amber hues lie on the X-axis. Moving to each axis or mixing both colours at the same time can exhibit completely different effects.
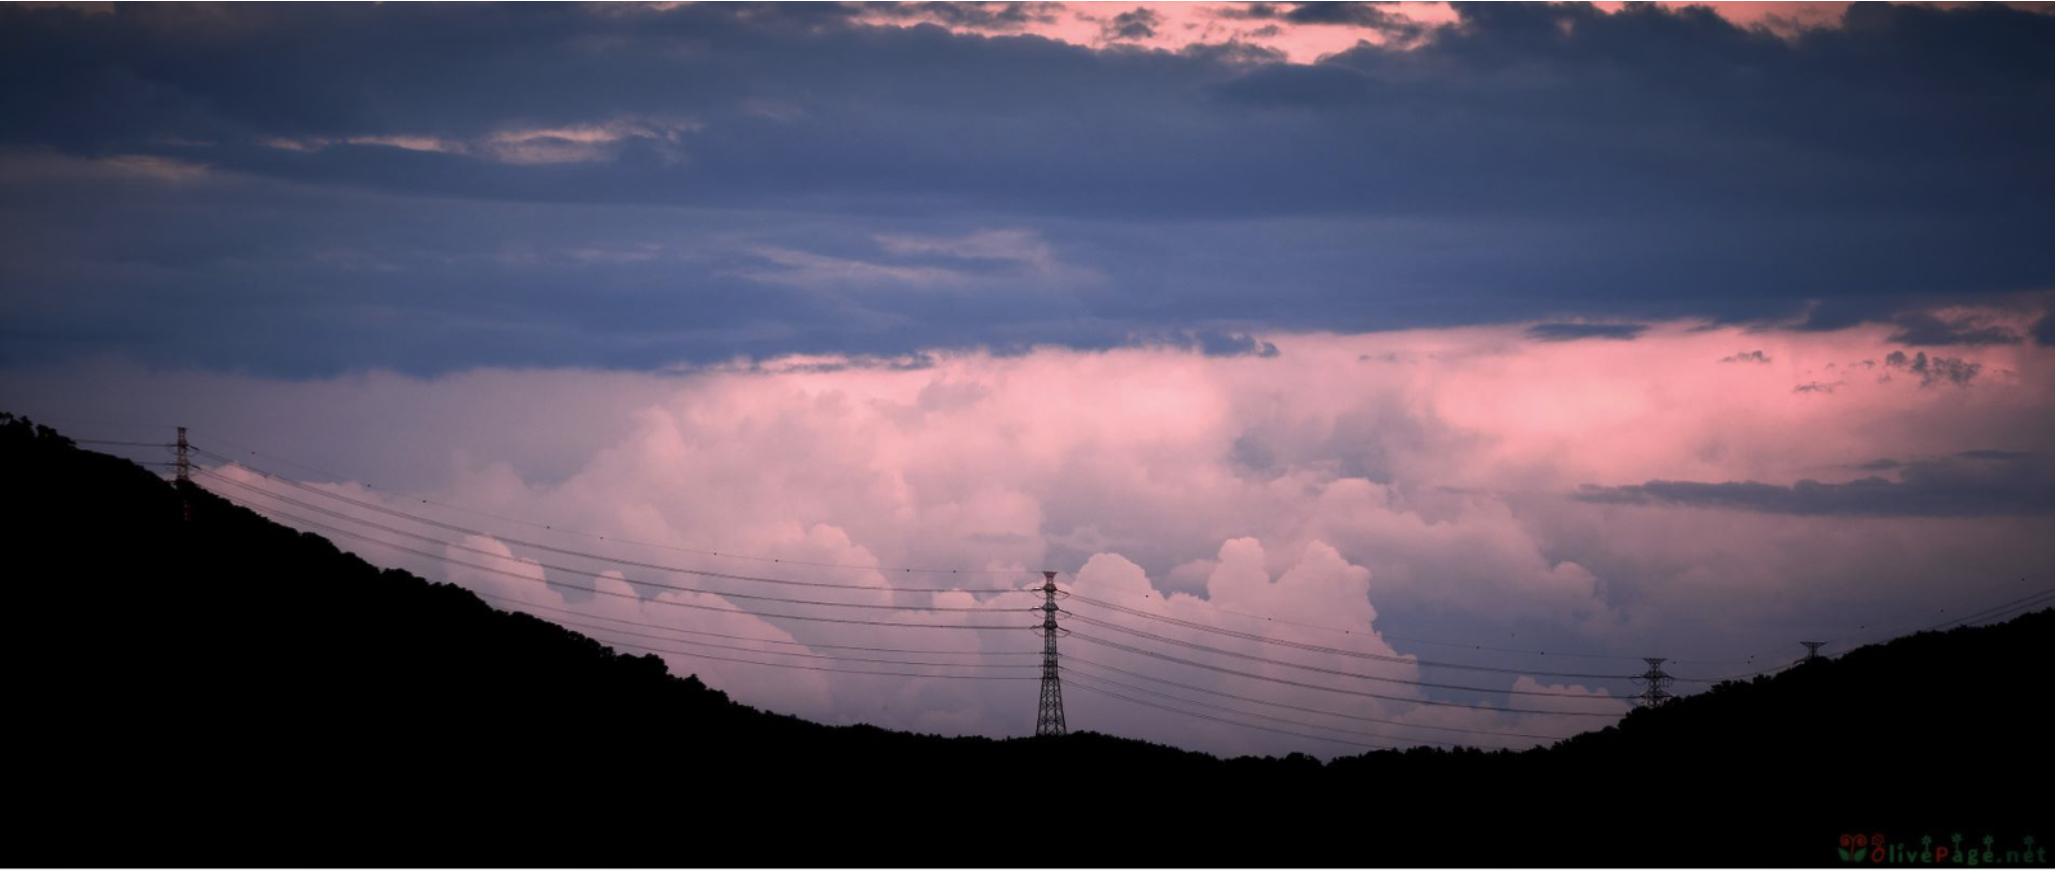
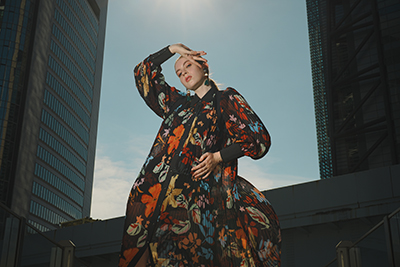
To demonstrate, let’s use this picture as an example. If you move in the A direction, the clouds in the evening light will appear more reddish.
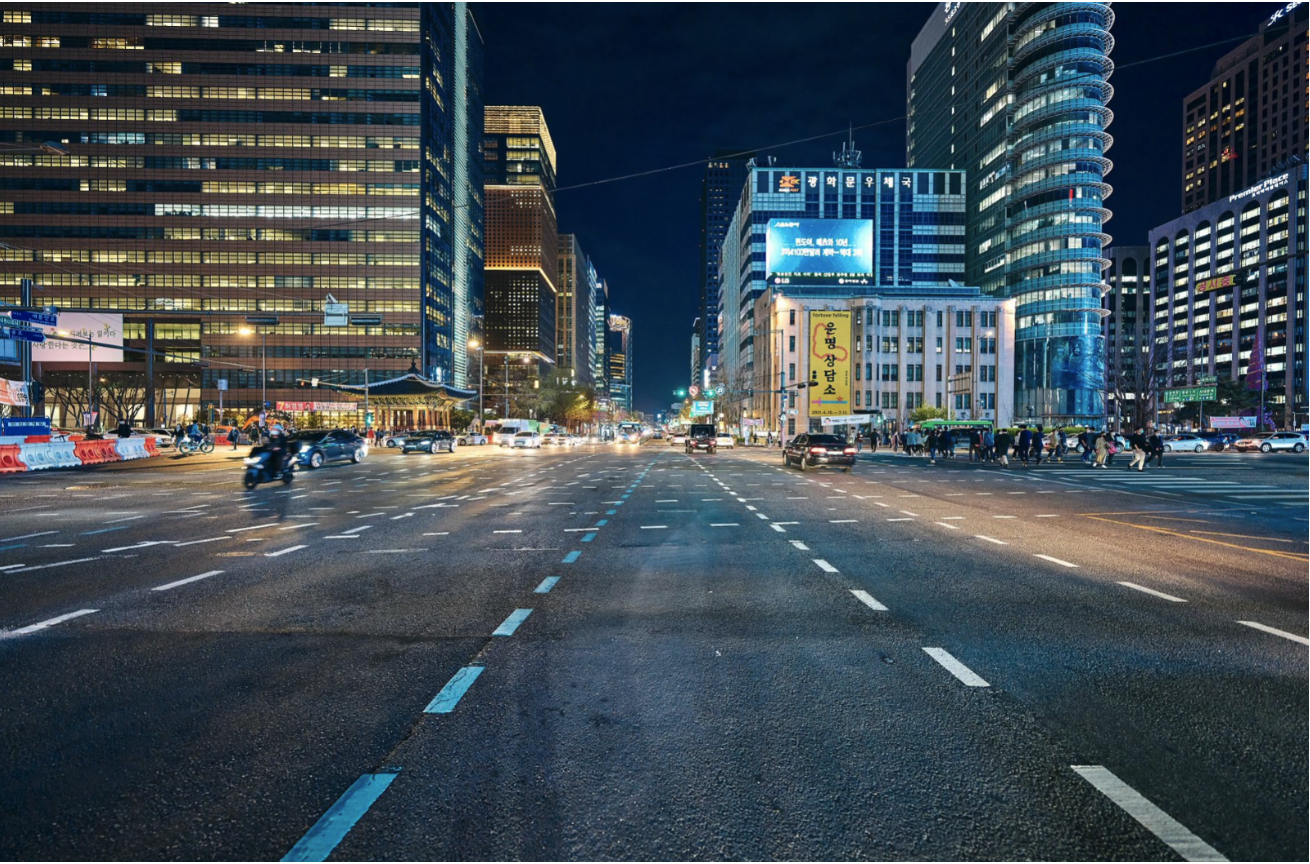
If you want to make the city in the evening look brighter, move in the B direction. The blue colour tone brings out the city's buildings in fantastic colours.
Shooting in RAW
At this point, you might be worried or unsure of which type of white balance is best suited for your shooting needs. For now, let's use RAW files to demonstrate. You can freely set your desired white balance through software such as Imaging Edge, leaving it entirely up to you to choose the right colour to show off your own style.
Now that you’ve got the hang of the key presets and customising your own white balance settings, it’s time to talk about the shooting process. When you shoot in JPEG, your image data gets compressed and unused colour data gets discarded. On the other hand, RAW files retain all the colour data captured, allowing you to adjust your white balance settings after taking your photo without losing image quality. It also helps that you have one less setting to worry about when you’re out on a photoshoot.
Whether or not to use AWB
Although there is an Auto White Balance (AWB) setting on your Alpha, it is better to adjust your white balance manually as there’s no better light sensor than our own eyes. This will help improve your photos significantly under various lighting conditions and set the mood you’ve envisioned for your photos. Photography is all about telling a story through still pictures, so colour tones can convey more messages than you might think. Some photographers prefer warmer tones for more sepia-looking photos, and that’s completely fine!
Figuring out how to adjust your white balance settings isn’t exactly a straightforward process but with trial and error, you’ll be able to figure out what suits you best.